|
Making Glass Start
Overview Modeling Molecules Animating the Reaction Setting the Stage Making Glass Mixing Chemicals Animating the Camera Animating Precipitation Putting It All Together 
|
|
Making Glass Start
Overview Modeling Molecules Animating the Reaction Setting the Stage Making Glass Mixing Chemicals Animating the Camera Animating Precipitation Putting It All Together
|
|
In this lesson, you will learn how to model the beaker and the flasks and make them look like glass. Before you begin, you will need to create and scan two images like these to map the labels on the flasks:
Modeling the Glassware Open Scene.max and resave it as Glass.max. Open the display panel and hide all the objects in the scene. Activate
the Front view and click Create a line for the flask profile using the X and Y axes for reference. Make sure to have both the initial type and drag type to Corner points:
Open the Modify panel and choose Vertex sub-object. Click Refine and then add two more vertices to the side of the flask:
Hide the flask and then create the beaker in its place. Use as few vertices as possible:
Unhide the flask profile and position it to one side:
Apply a Lathe modifier to each profile. Give each container enough segments to make its surface appear smooth:
Name the flask KI Flask and the beaker Beaker. Next, we will prepare the flask to be mapped with both glass and a label. Begin by
assigning a different material ID to the faces in the center of the flask
that will later become the label. Apply and Edit Mesh modifier to the flask. Click Sub-Object Face and select the faces in a band across the center of the flask:
In the top viewport, deselect the back faces of the label by holding down the ALT key.
In the Modify panel, enter 2 in the Material ID field:
From the Edit menu, choose Select Invert:
In the Modify panel, enter 1 in the Material ID field:
Click Select By ID and enter 2 in the selection field:
All the faces with material ID 2 are re-selected:
Apply a UVW Map modifier to the flask with the Face Sub-Object level is still active:
Note that an asterisk appears next to the name of the map modifier to indicate that it has been applied to a sub-object selection:
Finally, shift-clone the flask with the Move transform by holding down the shift key and dragging the flask to the right:
Name this flask Pb(NO3)2 Flask. In the camera view, right-click on the Camera viewport label and enable Show Safe Frame. Reposition the camera, flasks and/or beakers so that they fit within the green frame:
Open the Display command panel and click Hide by Hit. Click each of the flasks so that they disappear from view. Creating and Applying Glass Materials Open the Material Editor and select a new material sample. Right-click on the sample and choose 5 X 3 Sample Windows. The palette is redrawn to display more samples:
Select RayTraced_01.mat and then click Open. A library of ray-traced materials is loaded into the Material Editor. Select ClearGlass from the list of materials by double-clicking:
Make the following adjustments to the material:
Before
After
Next, click the Environment map button.
Before
After
In the Raytracer Controls rollout, uncheck Raytrace Reflections:
Click the Options button. In the Options dialog box, uncheck Global Antialiasing:
Close
the dialog box.
You might want to add a little self-illumination to the Table material and labels to lighten up their darkest values. I suggest you try around 20% in the Blinn Basic Parameters rollout. You may also need adjust the position and intensity of your lights a bit. Render the scene after every adjustment until you get something you like:
Next, unhide the KI Flask.
When queried, keep the old material as a sub-material. Then set the number of materials to 2.
Name the material "KI Flask."
Click
the Beaker material button in the material ID 1 slot. This takes you down
a level in the material tree, into the material settings. Rename the Beaker
material to Flask. In the Raytrace Basic Parameters rollout, check 2-Sided
and change index of refraction to 1.25:
In the Blinn Basic Parameters rollout, set self-illumination to 70%:
Click the Diffuse map button. In the Material/Map Browser, choose Bitmap. Navigate to your KI label and double-click it:
Copy the KI Flask material to the next material sample slot and rename the material Pb(NO3)2 Flask. In the standard material that is assigned to material ID 2, replace the texture map with one like this:
Unhide
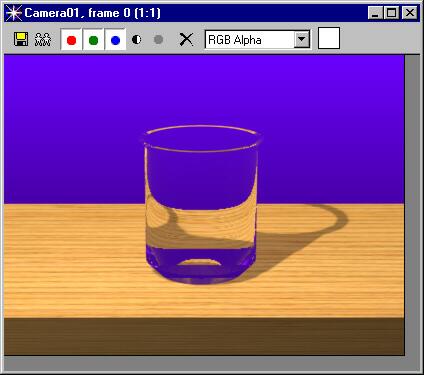
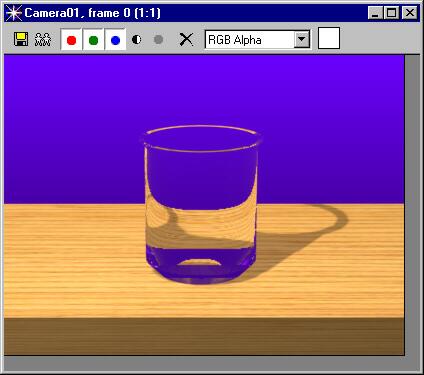
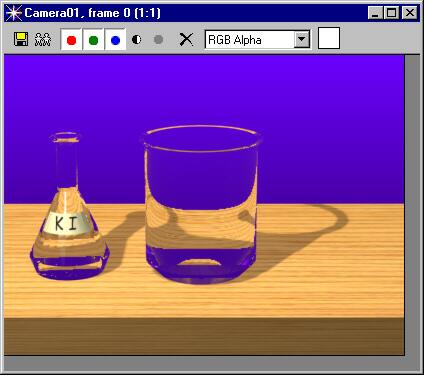
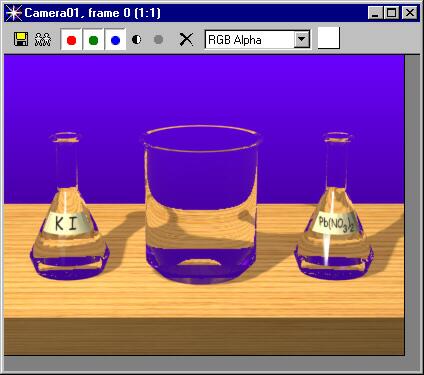
the Pb(NO3)2 Flask and Render the scene from the camera view:
For your final rendering of the day, select any raytrace material in the material editor and open its Raytracer Controls rollout. Click the Options button. In the Raytracer Options dialog box, enable Global Antialiasing and close the dialog box:
The final result will be smoother but much slower to render:
Save your scene. Congratulations! That was a pretty advanced set of materials. Now you are ready to mix the chemicals. |
© 2000 Michele Matossian
2.gif)